Wednesday, July 31, 2013

Recipe: Easy Eggplant And Tomato Harvest Skillet

This is one of my favorite ways to use up some of that extra eggplant from my CSA! Or check out your local farmer's market and load up on fresh summer veggies for this delicious light dish packed full of flavor, vitamins and nutrients. For a heartier meal, serve over cooked pasta or brown rice.

Easy Eggplant And Tomato Harvest Skillet
(Serves 2-4.)

Ingredients:


1 medium eggplant, peeled and cut into cubes
3 Tbsp vegetable oil
1 green bell pepper, seeded and chopped small
1 medium onion, peeled and diced small
4 large ripe tomatoes, chopped 
1 tsp sea salt
1/4 tsp black pepper
1 garlic clove, grated
1/4 cup grated fresh Parmesan cheese   

Directions:
  1. Heat a large heavy skillet over medium heat, add eggplant and oil, and cook, stirring occasionally, until eggplant starts to soften.
  2. Add all remaining ingredients except the Parmesan cheese, stir gently, and continue cooking until all vegetables are tender.
  3. Sprinkle the Parmesan cheese over the top evenly and cook just until cheese melts.  
  4. Remove from heat and serve immediately - by itself or with cooked rice or pasta.

Monday, July 29, 2013

Farmers Market Feasts - Fresh Food From Appetizer To Dessert

Late summer to early fall is prime farmer's market season in Ohio! The farmers market is a place where great ideas meet great fresh food and explode into incredible feasts. You can make one trip to the farmers market and gather enough ingredients to make a full five-course meal that will rival any fancy restaurant. Allow me to get your creative juices flowing as well as your taste buds jumping as we walk through a sample of what you might find to create your very own farmers market feast.

Appetizers 

You want to give your guests something to snack on while they are waiting to see what's coming next. Look for a loaf of homemade french bread, some fresh dill, goat cheese or other soft cheese, and red bell peppers for roasting. With these simple ingredients, you can have an amazing appetizer that will keep your guests well fed and eager for more. Simply cut the bread into thin slices and toast them over the grill while you are roasting your red peppers.

Combine the dill and goat cheese, spread on the toasted bread and top with thin slices of the roasted pepper. You can substitute prosciutto for the red bell pepper for another possibility. The idea is to look around the farmers market for inspiration as well as ingredients for the first course as well as for the main event.

Salads

Your salad options are as long and varied as the rows upon rows of displays at the market. Pick up  fresh lettuce, of course, but be sure to choose an interesting variety.  Look for complimentary produce such as pomegranates, pears, and apples, to match up with bitter greens such as chicory, arugula, watercress, and frisee.  Fresh baby bitter greens are a classic match up with sweet fruit.  And don't forget the berries.  When it comes to salads, fresh is the word, no matter how you build it.

Kale is another great farmers market find.  This remarkable green can be eaten raw or cooked.  One fun way to serve kale in a salad is as a crunchy topping.  Kale, when cut up into small pieces, can be roasted to create a delicate papery thin treat with a very fun crunch to it.  Sprinkle these nutritious crispy bites on top of your salad instead of croutons.  And don't forget to look for fresh herbs to create a savory dressing to go on your salad.  If you have citrus in your market, let that be your inspiration for your homemade vinaigrette.

Soups

Piles and piles of potatoes mean just one thing; inspiration!  No, the potato is not a lowly vegetable, not when you have the varieties available to choose from at a farmers market.  For the soup course you can't do much better than starting with potatoes.  One soup that should come to mind is potato leek soup. Simple, yet elegant, this filling soup should be served in small bowls with a pretty swirl of yogurt and a sprinkle of green onion on top. Other vegetables that work well for pureed soups are squash, pumpkin, rutabaga, parsnips, and turnips.  Mix and match for a splendidly soothing soup to relax your guests just long enough to get ready for the main course.

Look also to the bins of greens for inspiration for a soup course.  A small bowl of beet soup, hot or cold, is a wonderful start to a meal.  Hearty mustard greens and collard greens also make a splendid, bright, soup that gets the taste buds begging for more. Depending on your main course, you'll want to serve a soup that is either hearty and satisfying or light and refreshing.  Don't forget to include the fruit you find at your market and the herbs for soup inspiration.  Apple juice and cider make excellent soup bases.

Main Courses

After a start like this, it may seem as if you've exhausted all your farmers market has to offer, but this is where the simplicity of the market takes over.  A main course can feature something as simple as a perfectly executed sandwich. Pile seasonal cheeses on top of homemade multi-grain bread that has been slathered with herbed butter, then topped with a mix of ingredients for crunch. This can include sliced apples, greens, or a thin slice of sweet onion, or everything.  Something as simple as a grilled cheese sandwich becomes inspired when you layer market fresh specialty cheeses with fresh herbs, greens, vegetables, and fruit, and then grill between slices of hearty homemade bread.

And don't forget to look for fresh and smoked meats at your market.  Many farmers raise meat for the table as well as produce.  Big pots of peppery greens with lots of smoked sausage makes a bright and flavor-packed entree. During the late summer and early fall, the farmers market is also a great place to find a variety of fresh beans.  You will notice a big difference when you cook with fresh beans as opposed to dried beans.  The fresh beans are easier to cook and are very tender.  You can easily build a main course around the offerings at your local market.  All it takes is filling your basket and using your creativity and your good taste, and you'll fill your table with a main course that is very satisfying.

Desserts

Now comes the moment we have all been waiting for. Dessert. Nothing says farmers market dessert like fresh peach cobbler served in a pretty bowl and topped off with a scoop of rich vanilla ice cream.  Of course, apples are a big hit at many farmers markets during the fall season.  Apple pie or Apple crisp are the obvious desserts, but don't forget to think about applesauce, apple dumplings, or apple turnovers.

But, you don't have to bake fruit to have a dessert worthy of this five course meal.  Sometimes less is more.  Sliced apples, pears, or other fruit combined with a wonderful variety of cheeses is often the perfect ending to a hearty meal such as this.  Perhaps a steamy hot mug of apple cider will satisfy the sweet tooth at the end of the evening.  If oranges are in season in your region, try making orange sugar cookies. Not quite dessert-worthy in your book?  Melt some chocolate and dip the cookies about half way in to make treats that looks like, and tastes like, they came right out of a fancy mail-order catalog.

Can you really find enough at your local farmers market to produce a five course meal?  You sure can!  And not only five courses, but five star courses!  Fresh means fabulous when it comes to cooking.  Create each course to compliment the next and you can't go wrong. The only problem is you'll have trouble sending your guests home after they've been treated so well. You might as well start making up the guest room before you even serve dessert. Enjoy!

Friday, July 26, 2013

Recipe: Cucumber Ginger Salad

Enjoy this quick and easy salad recipe for a fresh twist on the classic cucumber salad. The addition of ginger and rice vinegar offers a unique Asian flavor, and with just a few simple ingredients, this one will taste like a gourmet treat without all the work. Best prepared ahead, this is great for a summer picnic or barbecue, pot-luck style - you may want to increase the size of the recipe as this one won't last long!

Cucumber Ginger Salad

Ingredients:

2 large cucumbers, peeled
1/3 cup rice vinegar
4 tsp white sugar
1 tsp kosher salt
1 1/2 tsp minced fresh ginger root

Directions:
  • Cut cucumbers in half lengthwise and remove any large seeds and extra pulpy flesh if necessary.
  • Slice into very thin pieces, crosswise, into crescent shapes.
  • In a bowl whisk together the vinegar, sugar, salt, and ginger.
  • Add the cucumbers to the bowl and toss together until well coated.
  • Cover and refrigerate for at least an hour before serving so the flavors blend well.

Wednesday, July 24, 2013

Recipe: Cool Cucumber Dressed Celery Slaw

Nothing says summer like a cool cucumber salad, and when you combine the cool crunch of cucumbers with fresh slaw, you have the ultimate in a summer picnic offering! The typical cabbage slaw is accented here with the cool juicy crunch of both cucumbers ans celery, and the yogurt dressing is light on fat, but high on flavor with fresh mint. This salad is super fresh flavored, and it should be eaten that way as well. For best results, prepare just before serving.

Cool Cucumber Dressed Celery Slaw
(Makes 4-6 side salads.)

Ingredients:


Image via Flickr
3 cups thinly sliced celery
2 cups finely shredded red or green cabbage
1 medium cucumber, peeled and seeded if seeds are too big
1 cup plain nonfat yogurt
3 Tbsp sugar (more or less to taste)
1 to 2 Tbsp finely chopped fresh mint
      
Directions:
  • In a large bowl, toss together the celery and cabbage; set aside.
  • In a separate bowl, make dressing by first grating the cleaned cucumber into a strainer placed over a bowl, then pressing grated cucumber lightly with the back of a large spoon to squeeze out excess liquid; discard liquid.
  • Dump cucumber out of strainer and into a clean bowl, and add the yogurt, sugar, and mint, stirring until sugar dissolves. 
  • Pour the dressing over the celery and cabbage mixture and toss well to combine.
  • Serve immediately or refrigerate if necessary for up to 1 hours.  The salad will tend to get watery if you keep it any longer than that.
  • Toss again just before serving.

Monday, July 22, 2013

Cucumbers: The Coolest Summer Veggie

When I think of summer, I think of tomato and cucumber salad - my two favorite summer veggies! While you may know a lot of ways to use tomatoes in the kitchen, cucumbers may not seem to have as many options, but you might be missing out on some of the delicious ways to use them! Often considered the “Green Goddess” of the home garden, this cooling vegetable is a long time favorite for many reasons.  Not only is a cucumber a refreshing snack on a hot day, it is also very versatile. You'll find cucumbers in a soothing facial masque and a jar of pickles.  You can't get much more versatile than that!  Let's take a look at a few facts about this humble garden favorite.


Image via Flickr
What is it?

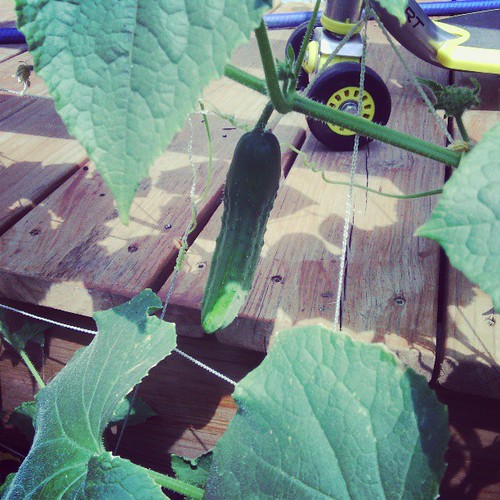
Cucumbers are oblong, green, vine-growing members of the gourd family, belonging to the same biological group as the cantaloupe, watermelon, pumpkin, and zucchini. There are several different varieties of cucumbers, including dwarf, standard, and pickling cucumbers that are used in different recipes and as side dishes or salad ingredients. Along with these uses, you'll find cucumber as an ingredient in an increasing number of skin care products.

History of the Cucumber
This vegetable is said to be native to India, and has been cultivated for as much as 3,000 years in Western Asia. Cucumber cultivation later spread to Greece and Italy, and was believed to be embraced especially by the Romans.  Later, cucumbers were introduced to China, and spread throughout Europe most likely by the Romans. There are records of cucumbers being grown in France in the 9th century and England in the 14th century.  The first recorded appearance in North America seems to be around the mid 16th century.

Cucumbers have had their ups and downs.  During the 1600s, there grew a concern that eating raw fruit and vegetables caused a variety of illnesses sometimes referred to simply as the “summer diseases.”  Many so called experts on health claimed these uncooked garden produce unsafe, especially for children.  Although a strong revolution took hold around the same time to eat simple healthy foods (credit sometimes given to the Quakers), the poor cucumber still suffered from the raw vegetable prejudice.  Thus the name “cowcumber” stemming from the notion that raw cucumbers were “fit only for consumption by cows.”  Now, of course, the cucumber is revered in even the poshest of spas!

Health Benefits

Cucumbers contain silica, which is a vital component of our body's connective tissues (cartilage, bones, ligaments, tendons, etc). Cucumber slices and juice are also used to treat various types of swelling of the skin and eyes. They also contain potassium, magnesium, and vitamin C, which are important ingredients indicated in regulating blood pressure.

Cucumbers also contain fluid that increases the ability to absorb fiber. The high water content of the vegetable is said to benefit healthy skin and complexion overall. It is also one of the best-known diuretics, promoting the secretion of urine and helping with a number of diseases of the liver, kidney, pancreas, and bladder. Even though some say because of their high water content they don't offer much nutrition, this would definitely contradict that assumption.

Fun Facts
One of the cucumber varieties is called Burpless, a commercially-grown, seedless alternative to other varieties that are reported to cause gas in some people. Another variety is the pickling cucumber, which are also commercially grown to produce uniform-sized cucumbers used specifically for pickles.

If you think someone sitting around with cucumber slices on their eyes is a bit strange, think again. Cucumbers really do reduce swelling of eye tissue.  And cucumbers are not just mentioned in fancy spas or in your favorite salad.  Even the Bible has information regarding this widely available food in ancient Egypt (Numbers 11:5).

How to Eat

Image via Flickr
Cucumbers are easy to prepare and enjoy. Most of the time they are included raw in recipes, but they can be cooked as well. You can remove the seeds if you slice the cucumber lengthwise and scoop them out with a spoon. Store-bought cucumbers are often waxed, so be sure to peel them before eating them. The best choice is organically grown, or fresh from your own garden!

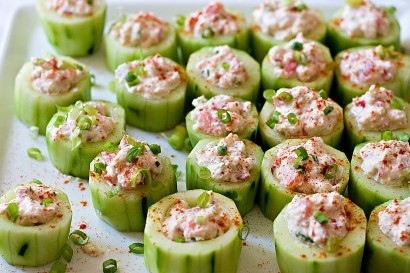
There are, of course, a number of cucumber salads that use vinegar, yogurt, or other creamy dressings. You can puree cucumbers and other vegetables into a hearty cold soup (gazpacho). You can also stuff them with a combination of cream cheese and horseradish for a delicious summer treat. Some people even create sandwiches using cucumbers with cream cheese, mayo, vinegar, and Worcestershire sauce.

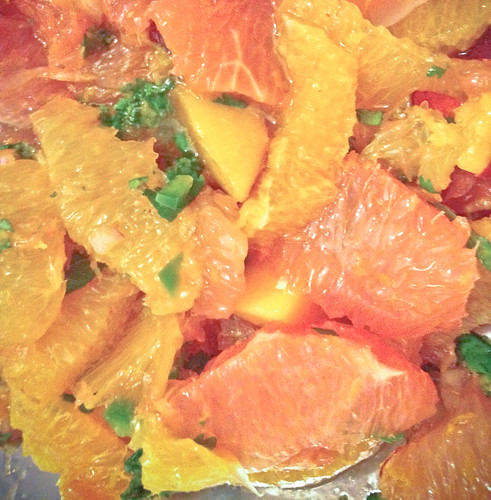
And don't forget about the relish, salsa, and pickle recipes available as condiments or side dishes. Many people enjoy pickling their own cucumbers at home, for more organic, true flavor and less preservatives. You can even make jelly from cucumbers, bake them in the oven with herbs and butter, saute them with a light panko crust, or create a delicious, rich tapenade with anchovies, capers, olives, and snack crackers. The best way to utilize cucumbers is to experiment with recipes that call for vegetables that add crunch, but don’t dominate the dish.

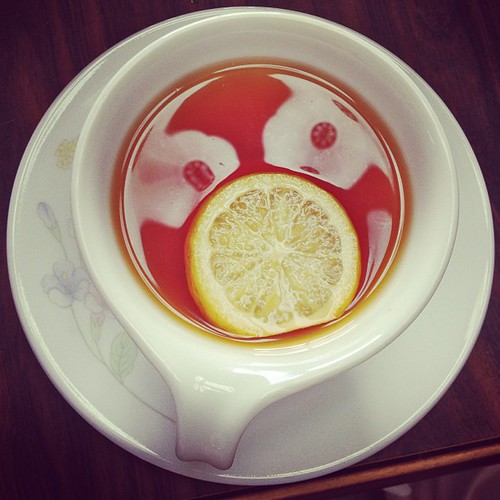
When they say “cool as a cucumber” they aren't kidding.  This is one vegetable that refreshes in so many ways.  Whether you're laying a slice on your eyelids and relaxing, or nibbling on a yummy salad, cucumbers are a very cool customer!  Check back later this week for some fun and tasty recipes utilizing this coolest of summer veggies.

Friday, July 19, 2013

Recipe: Beyond Borders Tangerine Lime Salsa

Why settle for an ordinary salsa when you can have something this good? Tangy limes and sweet tangerines mingle in this amazing, fresh Asian-inspired twist on a fresh summer salsa. Ginger, cilantro, and hot peppers accent the bright fresh citrus flavors, and will have your taste buds singing a sweet summer song!

Beyond Borders Tangerine Lime Salsa

Ingredients:


Image via Flickr
4 tangerines, peeled, seeds removed, segmented
2 limes, 1 zested and both juiced
1 Tbsp Hoisin sauce
1 Tbsp grated ginger root
1 Tbsp chopped fresh cilantro
1 Tbsp chopped green onion
1 Tbsp lime juice
1/2 Tbsp habanero or jalepeno pepper, seeded and chopped fine

Directions:
  1. Hold the tangerine segments over a glass bowl and, using sharp kitchen shears, cut up into small pieces, dropping into the bowl. You can cut the segments up with a knife but make sure you can capture the juice.
  2. Zest 1 lime into bowl, then juice both limes into the bowl.
  3. Add to the bowl all the remaining ingredients, mixing to combine.
  4. Cover the bowl with plastic and refrigerate for at least 1 hour before using.
  5. Makes about 2 cups of salsa.
  6. Use as a side with grilled fish or in seafood tacos or wraps.

Love citrus? Find more great recipes like this in this unique cookbook: 

The Lemon & Lime Cookbook
~ Rick Donker ~ 

This is a great resource for incorporating delicious, tangy flavor to everything from beverages to breakfast foods, soups, salads, main courses, and of course, delicious desserts. Add zest to recipes like Halibut with Lime Avocado Sauce, Eggs Benedict, German Pancakes, Roast Salmon with Lime Sauce, and even Homemade Lemon Ice Cream. With 179 pages, you'll have ample opportunity to go beyond lemonade and garnishes to a world of citrus goodness.

Wednesday, July 17, 2013

Recipe: Tangy Grapefruit Grilled Salmon

Infuse the summery flavor of citrus into your backyard barbecue with this simple and tasty recipe featuring sweet and tangy grapefruit and salmon. Balsamic vinegar and brown sugar bring out the natural sweetness of the fruit, which marries well with the rich taste of salmon. An easy recipe you'll want to remember!

Grapefruit Grilled Salmon
(Makes 4 servings.)

Ingredients:

1 large grapefruit, peeled and cut into segments, cutting away from the membranes (to this over a bowl to be sure to capture the juices)
1 large grapefruit, squeezed for juice, (add to reserved juices saved - you want at least 1 cup juice)
2 Tbsp balsamic vinegar
2 Tbsp dark brown sugar
4 salmon fillets (about 6 oz each)
1/2 tsp salt
1/2 tsp pepper

Directions:
  • In a saucepan over medium-high heat, whisk together the grapefruit juice, balsamic vinegar, and brown sugar, bringing to a boil. Keep the liquid at a gentle boil and continue cooking for about 12 to 15 minutes or until reduced in half; turn burner to low and keep warm.
  • Sprinkle the salmon fillets on both sides with the salt and pepper. 
  • Prepare indoor or outdoor grill.  Place salmon flesh side down and grill for 6 minutes or until you can easily move the fish, then flip over onto the skin side.  Now brush the top flesh side with prepared glaze.
  • Continue grilling for about 5 or 6 more minutes, brushing top flesh side of salmon with glaze two more times.
  • When salmon is cooked through, brush with a little more glaze and remove from grill.
  • Divide the grapefruit segments into 4 equal amounts and scatter on a serving plates, then top with grilled salmon fillets and drizzle even amounts of warm glaze on top of each salmon serving.

Monday, July 15, 2013

Freshen Up Your Summer Cooking With Citrus

Citrus brightens up good food and good conversation. Rather than cook the same old recipes, why not add some citrus twists to your dishes and give your guests something to fall in love with?  Let's take a look at a few classics that are getting a real boost with a little citrus.

Citrus Infused Tea


Image via Flickr
What an incredible way to wake up!  Start a big pot of water boiling, then shut the burner off and add four green tea bags.  Of course, that's good, but why stop there.  Add a thinly sliced lemon to the water and allow the tea to steep for four or five minutes, then serve hot by pouring into large mugs.  Sweeten if desired, then enjoy. The lemon adds even more nutritional value to your green tea, along with a real zing! You may even want to nibble on a few hot lemon slices.

Lemon Ricotta Pancakes

Instead of your typical pancake mix, why not try a melt-in-your-mouth combo that is sure to start your morning off right? By substituting ricotta, lemon juice, and lemon zest in place of some of the liquid in the pancake recipe, you get a slightly sweet and fluffy pancake with a tangy hit of citrus. Serve the pancakes with either raspberry or boysenberry syrup, and you have an irresistible combination that your family will love.

Grilled Summer Vegetables with Citrus Splash Dressing

The grill? Yes, even the grill. Not only can you grill citrus, you can coat your summer veggies with dressing using the same marinade you soaked them in. Orange juice, orange zest, lime juice, lime zest, and a bit of honey make a great glaze for grilled vegetables.  Add a little chopped fresh basil or other herbs on top of your vegetables on the grill and you just became the new executive chef of your own backyard. Try serving these tangy, tasty veggies on top of a bed of crispy mixed lettuce for a filling lunch or light dinner.


Image via Flickr
Lemon Basil Chicken Stir-fry

Want to take your stir-fry dinners to another level? Try adding some finely chopped basil, lemon juice, and lemon zest to your pan before you begin to add your vegetables. The basil and zest will infuse the oils with flavor and coat the chicken as you begin cooking it. Once the chicken is cooked, the vegetables will soak up the remaining flavor bits in the pan when it is deglazed with added broth or wine. Whenever you stir fry, think beyond the ingredients and consider all the flavors, including citrus flavors, to brighten your dish.

Citrus Honey Ginger Pops

This cool treat is definitely tasty and something to help cool off after a long day of play, making it a perfect dessert, too! These pops are easy to make and are a billion times healthier than the ones you buy from the store. Use different types of citrus to give the pops a variety of flavors. Of course you'll want to try orange, but also give grapefruit and lime a try. Just mix your favorite citrus juice and zest with honey and a small amount of grated ginger. The great thing is, this recipe is made to be tweaked. Mix and match your citrus to find new and exciting flavors!

From breakfast to lunch to dinner to dessert, citrus adds 'zing!' to your meals. There are so many places you can add fresh, flavorful, and healthy citrus to each meal of the day. The next time you're shopping, don't let the citrus scare you … bring it home!  Then put it to work in your kitchen to brighten up your meals, and your life!

Friday, July 12, 2013

Recipe: Simply Elegant Grilled Squash Salad

This one is as simple as it is tasty. Grilling brings out the natural sweetness of the squash, and a few fresh herbs and some good quality oil and vinegar are all you need to create a gourmet salad that's perfect for summer. Top it off with a sprinkling of Parmesan cheese, and you've got a dish that will please the most sophisticated of palates with ease - and it's a great way to use up all that extra summer squash!

Simply Elegant Grilled Squash Salad
(Serves 4-6.)

Ingredients:

4 medium zucchini, ends cut off, large seeds scooped out, halved lengthwise
4 medium yellow summer squash, trimmed, halved lengthwise
5 Tbsp olive oil, divided
1/2 cup chopped fresh basil
1/2 cup freshly grated Parmesan cheese
2 Tbsp balsamic vinegar

Directions:
  • Turn grill on or get charcoal set to medium heat.
  • Arrange zucchini and yellow squash on a big platter, cut side up, and drizzle with 3 tablespoons oil, then sprinkle with salt and pepper and rub to coat veggies evenly.
  • When grill is ready, put zucchini and yellow squash on cut side down; cook for 5 minutes or until grill marks are nice, then flip and grill for about 5 minutes more or until brown and tender.
  • Remove and allow to cool in order to handle, then cut into strips crossways, then into rough chopped bite-sized pieces.
  • Put pieces in a large serving bowl and add the basil, Parmesan cheese, balsamic vinegar, and 2 tablespoons of remaining olive oil;  toss gently until coated nicely.
  • Taste and add salt and pepper if desired.  Serve immediately.

Enhanced by Zemanta

Wednesday, July 10, 2013

Recipe: Grilled Peaches a la Rosemary over Arugula Endive Salad

This delicious recipe combines the sweet and smoky flavor of grilled ripe peaches, with rosemary and tangy endive and arugula for a gourmet salad treat you won't soon forget!

Grilled Peaches a la Rosemary Over Arugula Endive Salad
(Makes 4 individual salads.)

Ingredients:

Grilled Peaches
Grilled Peaches (Photo credit: mccun934)
2 ripe, but still firm, peaches, wash and cut in half (remove stone)
1 Tbsp olive oil
2 Tbsp fresh rosemary, chopped
1/4 tsp kosher salt
2 small Belgian endive, washed and each leaf removed whole
2 cups arugula
4 fresh mozzarella balls
drizzle good balsamic vinaigrette (or olive oil and balsamic vinegar mix)
dash kosher salt and ground black pepper

Directions:
  •  Prepare a grilling pan (or grates) by spraying with non-stick grilling oil, then set grill to medium heat.
  • Put peach halves in bowl with olive oil, rosemary and kosher salt, and toss to coat.
  • When grill is preheated, put the peaches on, cut side down, and grill for 4 to 5 minutes, until charred lightly, then flip and grill 3 to 4 more minutes until softened slightly and charred. Remove and set aside to cool slightly.
  • Prepare individual salads by arranging endive leaves between 4 salad plates, then top each plate with 1/2 cup arugula, place one grilled peach half on top of the arugula, tear one mozzarella ball in half (for each salad) and place on top, then drizzle with a little balsamic vinaigrette and sprinkle a dash of kosher salt and freshly ground black pepper to taste.
  • Serve immediately.

Enhanced by Zemanta

Monday, July 8, 2013

Fire Up The Grill For Glamorous Gourmet Fruit Salads

Nothing says summer like a fresh salad, and although we've been talking about grilling a lot lately, you may not think of a salad as a grilled food. But if you're thinking that grilling is all about heavy meals of barbecued meats, you'll be surprised what other foods actually are perfect for the grill!

Setting the Stage for Grilled Fruit Salads

Grilled Shrimp and Fruit Salad
Grilled Shrimp and Fruit Salad (Photo credit: Dalboz17)
If you're mixing your grilled fruit in a green salad, be sure to choose your salad green carefully.  Grilling adds a deeper flavor to fruit, so something hearty like arugula, romaine, watercress, or a mix of colorful greens might be best to form the bed of the salad and to compliment.

A grilled fruit salad also does well with a light vinaigrette dressing, made from basic ingredients like olive oil, salt and pepper, and your choice of vinegar.  However, you might enjoy a creamy salad dressing made with honey and yogurt. Or perhaps a mixture of brown sugar, heavy cream, and red wine vinegar sounds tasty to you. There are plenty of possibilities to compliment your grilled fruit salad.

Choose Fruit that Suits the Grill

Once you've got the stage set, then it's a matter of choosing fruits that grill well. Apricot halves are first up, combined with toasted nuts and thin slices of  bacon, this makes a delightful gourmet twist with any salad green. Try grilling pineapple and mango slices, garnish with fresh mint leaves, and mix with crunchy cold butter lettuce for a surprising salad that will really please your dinner guests or family.

Even fruits like plums, watermelon, peaches, and nectarines are good to grill for salads and it doesn't have to be a large salad of greens, either. For instance, cut watermelon into four inch squares and grill quickly on one side, flip and grill on the other side until you see grill marks form. Then serve on a bed of arugula and top with feta cheese, and drizzle balsamic vinaigrette over. You now have a gourmet salad with just a few ingredients. Grilling the watermelon makes all the difference.

A grilled fruit salad could also be exclusively made with grilled fruit. Try grilling a whole pineapple, cut lengthwise in half, treating the pineapple as the fruit bowl. Top with small pieces of fruit such as red pears, kiwi, bananas, or cactus fruit and set the grill on high, grilling just until the pineapple chars a little. Remove from the grill and serve as is or with a dollop of Greek yogurt. Both halves of the pineapple becomes the salad itself.

Grilled Pineapple
Grilled Pineapple (Photo credit: Another Pint Please...)
Mixing up Main Dishes With Grilled Fruit

For a heartier main dish, try putting chunks of fruit on a kabob skewer alternating with firm pieces of fish like halibut, swordfish, or salmon, or shrimp, scallops, or even pieces of chicken. Grill until everything chars a bit, then serve over brown rice. Most people expect kabobs to have vegetables, so the grilled fruit makes a nice surprise. Of course, some vegetables compliment certain fruit, as well. Sweet onion on the kabob adds a nice flavor contrast to pineapple, for instance. Just use your creativity when you put your fruit kabobs together for the grill.

Grilled fruit can also be a garnish for beef, chicken, fish, or even ham. Cut wedges of papaya, mango, pineapple, and maybe a red pepper and sweet onion, and grill until slightly charred. Then cool and cut into small pieces and toss together with a light vinaigrette. This grilled 'fruit salsa' makes a perfect garnish. Make it spicy or savory if you wish by adding hot sauce, a bit of cayenne pepper, or some fresh herbs.

Don't Forget Grilled Fruit Desserts

A variety of fruits can be grilled to produce a tasty topping for ice cream, pound cake, or other treats. Grilled bananas topped with ice cream and caramel sauce is a favorite that comes to mind immediately. You can even put chunks of chocolate on while the bananas grill to create another layer of flavor.

Fruit compote made on the grill is another twist on a favorite. Rather than just boil or bake fruit pieces in a pan with a liquid, put the fruit on the grill on high heat, quickly grilling until you have grill marks and the fruit is softened. Move the fruit onto a piece of heavy duty foil, top with a mixture of brown sugar, butter, and honey. Then seal the foil into pouches and continue cooking on the grill until fruit is very soft. The grilling adds a whole new flavor to your traditional compote.

If you have never considered putting fruit on your grill, this is your chance to experiment. It's surprising how many fruits cook up so well on the open pit. Once you have your fruit grilled, you'll find all sorts of ways to enjoy them. You may become so hooked on grilling fruit that now find it will be hard to make room for the barbecued meat!
Enhanced by Zemanta

Friday, July 5, 2013

Recipe: Grilled Skirt Steak In Sweet Balsamic Marinade


Sweet and tangy flavors accent this delicious steak for a fast and easy grilled meal that will wow you tastebuds - and your guests! Spice it up with a few red pepper flakes if you like, or serve with grilled onions or shitake mushrooms for a gourmet twist. Either way, you can't go wrong with this simple and versatile recipe.

We hope you've enjoyed the past month of learning and grilling great meals! Be sure to stay tuned throughout the summer for more delicious, fast, fresh and easy summer cooking tips and from-scratch recipes.

Grilled Skirt Steak In Sweet Balsamic Marinade(Serves 2-4.)

Ingredients:

1/4 cup balsamic vinegar
1 tbsp Worcestershire sauce
2 tsp dark brown sugar
1 garlic clove, minced
1 pound skirt steak, trimmed and cut into 4 pieces
salt and pepper

Directions:
  1. In a large glass bowl, whisk together the balsamic, Worcestershire, brown sugar, and garlic.
  2. Add the skirt steak to the mixture, cover with plastic wrap and let sit for 25 minutes at room temperature. Turn the meat in the bowl several times during the marinating process.
  3. Prepare grill to medium-high heat and oil the grate or prepare a grilling pan for the steak.
  4. Remove steak from the bowl and discard marinade.
  5. Sprinkle both sides of steak with salt and pepper, then place steak on grill, close lid, and cook for just 3 minutes, flip and cook another 3 minutes or until done to your liking.
  6. Remove steak from grill and let the steak stand at room temperature for 5 minutes; cover loosely with a foil tent, but do not close tight.
  7. Cut steaks into very thin slices on the diagonal and serve immediately.

Enhanced by Zemanta

Wednesday, July 3, 2013

Recipe: Grilled Sweet Bourbon Tenderloin Steaks

Nothing says American like bourbon and beef! This 4th of July, fire up the grill for this super-simple and incredibly tasty recipe that is soon to become a favorite in your household. The recipe below serves 2, but is easily adjusted for your 4th of July barbecue needs. Once you've tried it, you'll want to repeat it soon as a romantic one-on-one summer evening dinner as well!

Grilled Sweet Bourbon Tenderloin Steaks
(Serves 2.)

Ingredients:

2 beef tenderloin steaks, 1 1/2 inch thick
2 Tbsp Bourbon
2 Tbsp brown sugar
1/4 tsp salt
1/8 tsp fresh ground black pepper

Instructions:
  1. Whisk together the bourbon, brown sugar, salt, and pepper in a bowl, and pour over steaks in a glass dish.  Let sit for 10 minutes.
  2. Preheat grill to medium-high.
  3. Place steaks on preheated grill and cook for approximately 13 minutes for rare, 17 for medium, or 20 for well done, turning once during cooking time.
  4. Remove to a plate and let rest for 3 minutes before cutting.

Enhanced by Zemanta

Monday, July 1, 2013

3 Easy Tricks to Grilling Restaurant Worthy Steaks Like A Pro

This week we're celebrating the quintessential grilling holiday - that being, of course, the 4th of July! All across the country, in cities, small towns, and farmsteads alike, we'll be firing up those barbecue grills. And of course, one of the tastiest and most popular grilling items is the good old steak!

Over the past month, you have mastered the basics of your grill and now you are ready to start showing off your skills a bit more - just in time to serve perfect steak at your 4th of July barbecue this week! What better vehicle to grill with bravado than the classic – grilled steak.  There are three simple things to do to acquire restaurant quality perfection when it comes to grilling a nice beef steak. Let's get started.  My mouth is watering already!

1. Learn to Turn for Perfect Grill Marks

Have you ever envied those amazing sear marks you see on steak in restaurants? Be honest. You wish you could duplicate that at home. Well, it is a lot easier than you think. All you need is a hot grill, a pair of tongs, and at least a little knowledge of geometry. Yes, geometry.

English: I smoke it first for about 7 minutes ...
(Photo credit: Wikipedia)
First things first; make sure your steak is at room temperature.  Then, make sure your grill is nice and hot. The searing comes when the meat touches the extremely hot surface and begins to char the outer layer of meat. Once you have your first set of grill marks, and here's where your geometry comes in handy, turn your food at a 45 degree angle onto a new hot area of the grill.

You can also imagine making the letter 'V' with where it was laying and where it is going to lay. Also, be sure that the grates are hot where you are moving it too – if they are not hot, your grill marks will not be as prominent. Now your steak will look like it came from a five star restaurant.

Once you have the grill marks set on the top of the steak, you can flip your steak and you can continue cooking the steak until it's done to your liking. That's the bottom side and no one will see it, so it's not necessary to score it... unless you're absolutely hooked on this bit of fun.

2. Pick Up Steaks and Move

Now your presentation side is done and you just have to finish cooking the rest of the meal. This is where a giant grilling myth is busted. Many people think once you set your food on the grill, you are not supposed to pick it up, move it or even look at it until the suggested time is up.

Moving your steak, or other food, around on the grill helps ensure you get even cooking and can even help regulate internal temperature and doneness.

For instance, say you have a steak that you want to prepare to medium well. You have created your grill marks and flipped it over. The bottom is starting to look done, but it is still only medium in the middle. Instead of keeping the steak where it is, chancing that the bottom will get burnt so the middle is medium, why not move it to a cooler part of the grill and close the lid. This slows down the cooking of the outside of the steak while acting like an oven to cook the rest to its desired doneness.

3. A Good Steak is Pretty in Pink

While the USDA and other organizations still warn against undercooked meat, there are plenty of meat-loving grilling maestros who really don't see the reasoning.  A good cut of meat that has been grilled until it resembles charcoal is an abomination to the whole experience.  Steak will get tough as it gets closer to well-done simply because it's drying out. 

English: Reindeer steaks from the Lidl, sold f...
 (Photo credit: Wikipedia)
That's not to say that you have to eat meat that is rare to have a delicious steak.  But, if you cook the smithereens out of your steak, making sure it loses all its pink color on the inside, you will be left with a less than enjoyable result on your plate.

You have to take into account that the steak continues to cook after you remove it from the grill.  It's not a lot, but it is enough to go from done to well-done if you're not careful.  For this reason, always take your steak off when you are thinking “Just one more minute.” 

Remove your steak with tongs not a fork. Poking holes in the steak will let the juices run out.  And please do not slice into the meat to see if it's done!  This is a major no-no. Instead, use the hand test.   With your hand open, feel the flesh under your thumb.  That's how a rare steak feels.  Close your hand;  that's how a steak cooked medium feels.  Clench your hand tight;  that's how a well-done steak feels. 

Remove your steak before it has the 'clenched hand flesh' feeling.  Set your steak on a warm plate or cutting board and allow it to rest for 3 to 5 minutes while you dish up the rest of the meal.  Then and only then cut into the meat.

Another reason for leaving your steak a bit pink inside is for leftovers.  If you're like me, you are thrilled to see that little piece of steak in foil the next day in the fridge.  Now you can pull it out, slice it thin, and use it in a fajita or an omelet or other great dish.  But, if the steak is overcooked already, it will just get tough as you cook it more.  In tomorrow's breakfast or lunch, your medium-rare to medium steak will lose its pink, but not its flavor if you're careful and don't over-heat it. Remember this simple rule, you can always cook food more, but you can never cook it any less.  So keep that steak at least a little pink inside.

By keeping these three tips in mind, you will create a perfectly grilled steak that will amaze your family and friends.  You'll wonder why you ever wasted your money ordering steak at a restaurant. And maybe you never will again!

Be sure to check back in the next couple of days for some tasty steak recipes for your 4th of July barbecue, as well as the rest of the grilling days of summer.

Enhanced by Zemanta